- 1. Features
- 2. vQmod / OCMod
- 3. Install
- 4. Upgrading
- 5. Uninstall
- 6. Support
- 7. Extensions Compatibility
- 8. Requirements and Limitations
- 9. Terms and Conditions
- 10. Changelog
-
Customer Edit Page [Customers > Customers > Edit]
- Order History Tab
- Purchased Products Tab
- Shopping Cart Tab
- Wishlist Tab
- Customer Track Tab
Here you will find the list of all customer orders. Data can be filtered by Statistical Range or Date Range and Order Status.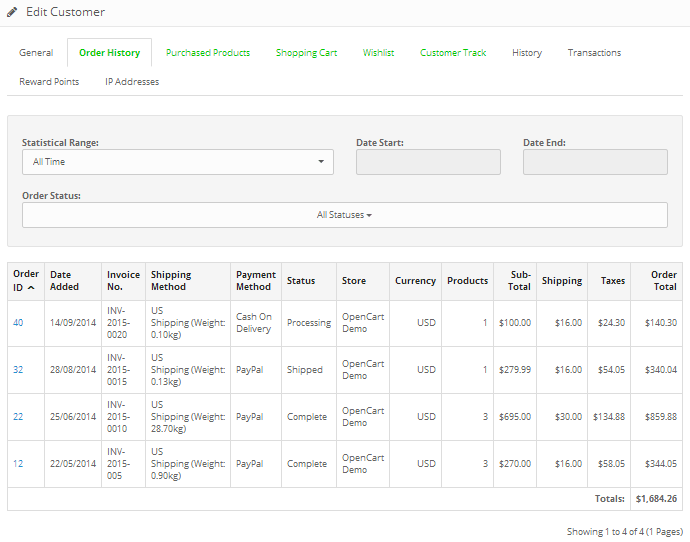 Here you will find the list of all products that customer bought. Data can be filtered by Statistical Range or Date Range and Order Status.
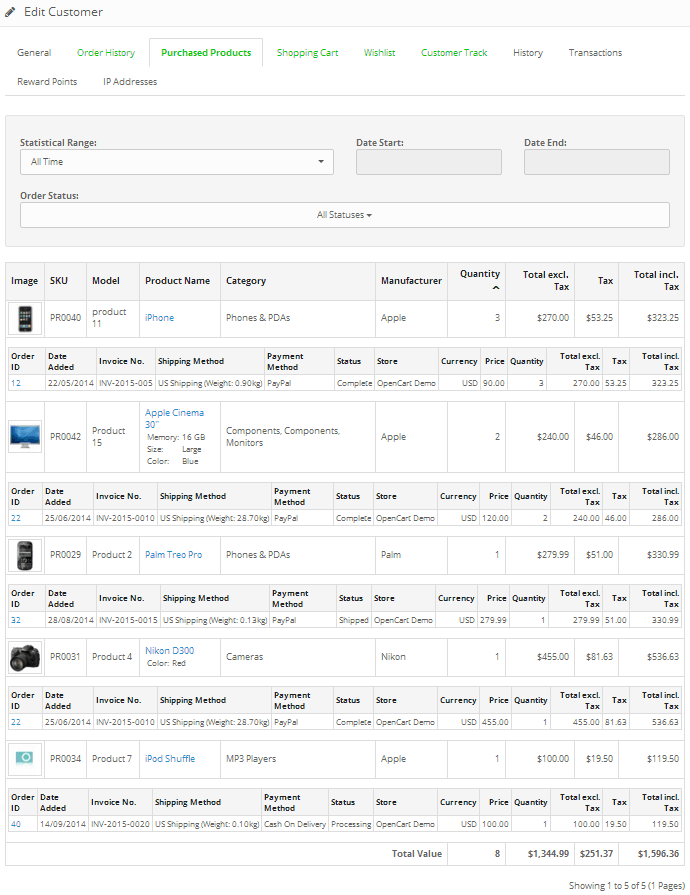 Here you can show and delete the content of customer's shopping cart.
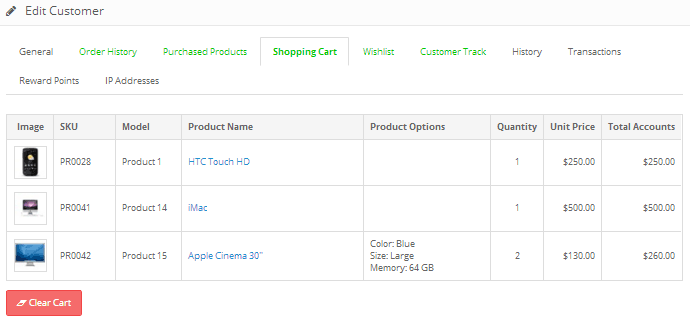 Here you can show and delete the content of customer's wishlist.
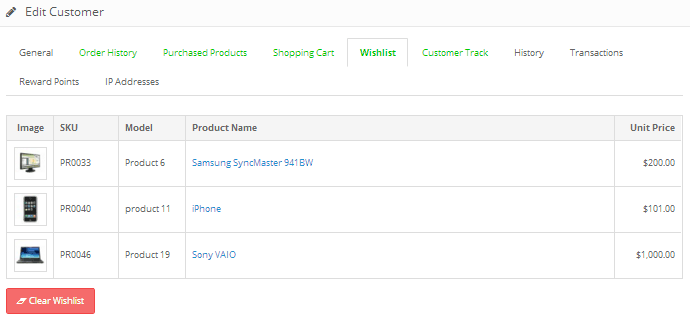 Here you can show and delete log of customer behavior and activity. Data can be filtered by Statistical Range or Date Range.
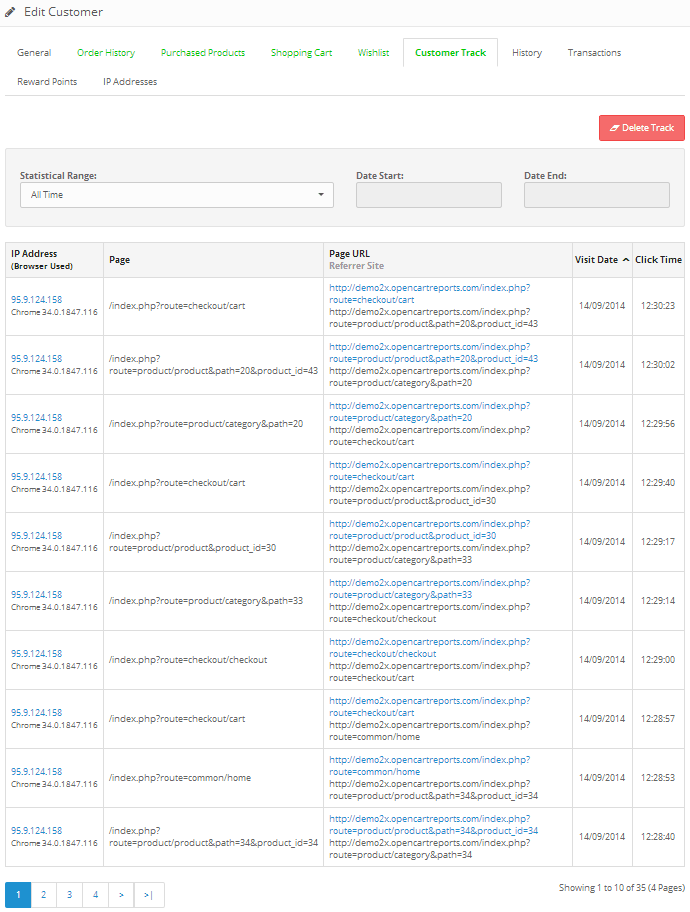
-
Customer List Page [Customers > Customers]
On customer list page was added columns Orders and Total Value for quick overview of number of orders and total value of all orders for every customer. Columns can be sorted.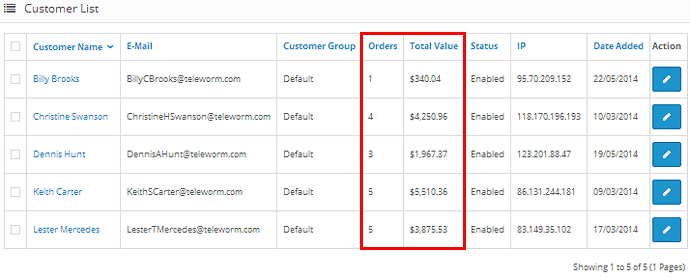
- vQmod 2.0 Offical Thread with all the information you will need to help get you started.
- Further information can also be found on the vQmod Project Wiki Page.
- Install the archive adv_extended_cust_info_v?_OCv3x.ocmod.zip via Extension Installer (Extensions -> Installer).
- Navigate to Modifications page (Extensions -> Modifications) and click on the light blue 'Refresh' button at the top of the screen to rebuild the modifications.
- From the admin menu navigate to the list of installed modules (Extensions -> Extensions -> Modules), here you will see a new module called ADV Extended Customer Information and click on the green 'Install' button. After this click on the blue 'Edit' button for ADV Extended Customer Information. This step is required to finish installation and proper functionality of module. Now you can set configuration you may need/wish.
- Unzip the archive adv_extended_cust_info_v?_OCv2x.zip and upload the content of folder 'upload' to the root directory of your OpenCart installation. Some files could be overwritten if you already have installed other ADV Reports, it's OK.
- From the admin menu navigate to the list of installed modules (Extensions -> Extensions -> Modules), here you will see a new module called ADV Extended Customer Information and click on the green 'Install' button.
- Install file adv_extended_cust_info_OCv2x.ocmod.xml from the directory 'ocmod' via Extension Installer (Extensions -> Installer).
- Navigate to Modifications page (Extensions -> Modifications) and click on the light blue 'Refresh' button at the top of the screen to rebuild the modifications.
- From the admin menu navigate again to the list of installed modules (Extensions -> Extensions -> Modules) and click on the blue 'Edit' button for ADV Extended Customer Information. This step is required to finish installation and proper functionality of module. Now you can set configuration you may need/wish.
- Make sure that vQmod is installed on your server and check that it's generating the core cached files in: vqmod/vqcache.
- Unzip the archive adv_extended_cust_info_v?_OCv2.zip and upload the content of folder 'upload' to the root directory of your OpenCart installation. Some files could be overwritten if you already have installed other ADV Reports, it's OK.
- Upload file adv_extended_cust_info_OCv2x.xml from the directory 'vqmod' into your vqmod/xml folder.
- Delete all files in vqmod/vqcache folder with file names like vq2-file_name.php and the mods.cache file from main vqmod folder.
- Navigate to Modifications page (Extensions -> Modifications) and click on the light blue 'Refresh' button at the top of the screen to rebuild the modifications.
- From the admin menu navigate to the list of installed modules (Extensions -> Extensions -> Modules), here you will see a new module called ADV Extended Customer Information and click on the green 'Install' button, then click on the blue 'Edit' button. This step is required to finish installation and proper functionality of module. Now you can set configuration you may need/wish.
- Make sure that vQmod is installed on your server and check that it's generating the core cached files in: vqmod/vqcache.
- Unzip the archive adv_extended_cust_info_v?_OCv156.zip and upload the content of folder 'upload' to the root directory of your OpenCart installation. Some files could be overwritten if you already have installed other ADV Reports, it's OK.
- Upload file adv_extended_cust_info_OCv156.xml from the directory 'vqmod' into your vqmod/xml folder.
- Delete all files in vqmod/vqcache folder with file names like vq2-file_name.php and the mods.cache file from main vqmod folder.
- From the admin menu navigate to the list of installed modules (Extensions -> Modules), here you will see a new module called ADV Extended Customer Information and click on the green 'Install' button, then click on the blue 'Edit' button. This step is required to finish installation and proper functionality of module. Now you can set configuration you may need/wish.
- Unzip the archive adv_extended_cust_info_v?_OCv2x.zip and upload the content of folder 'upload' to the root directory of your OpenCart installation. Replace all files.
- Navigate to Modifications page (Extensions -> Modifications) and tick the checkbox for ADV Extended Customer Information and click on the red 'Delete' button at the top of the screen.
- Install adv_extended_cust_info_OCv2x.ocmod.xml from the directory 'ocmod' via Extension Installer (Extensions -> Installer).
- Navigate again to Modifications page (Extensions -> Modifications) and click on the light blue 'Refresh' button at the top of the screen to rebuild the modifications.
- From the admin menu navigate to the list of installed modules (Extensions -> Extensions -> Modules) and click on the blue 'Edit' button for ADV Extended Customer Information. This step is required to finish upgrade and proper functionality of module.
- Unzip the archive adv_extended_cust_info_v?_OCv2x.zip and upload the content of folder 'upload' to the root directory of your OpenCart installation. Replace all files.
- From the directory 'vqmod' upload adv_extended_cust_info_OCv2x.xml file into your vqmod/xml folder. Make sure that old adv_extended_cust_info_OCv2x.xml file was removed.
- Delete all files in vqmod/vqcache folder with file names like vq2-file_name.php and the mods.cache file from main vqmod folder.
- Navigate to Modifications page (Extensions -> Modifications) and click on the light blue 'Refresh' button at the top of the screen to rebuild the modifications.
- From the admin menu navigate to the list of installed modules (Extensions -> Extensions -> Modules) and click on the blue 'Edit' button for ADV Extended Customer Information. This step is required to finish upgrade and proper functionality of module.
- Unzip the archive adv_extended_cust_info_v?_OCv156.zip and upload the content of folder 'upload' to the root directory of your OpenCart installation. Replace all files.
- From the directory 'vqmod' upload (replace) adv_extended_cust_info_OCv156.xml file into your vqmod/xml folder. Make sure that old adv_extended_cust_info_OCv156.xml file was removed.
- Delete all files in vqmod/vqcache folder with file names like vq2-file_name.php and the mods.cache file from main vqmod folder.
- From the admin menu navigate to the list of installed modules (Extensions -> Modules) and click on the blue 'Edit' button for ADV Extended Customer Information. This step is required to finish upgrade and proper functionality of module.
- From the admin menu navigate to Extension Installer (Extensions -> Installer) and in Install History click on the red 'Uninstall' button for adv_extended_cust_info_v?_OCv3x.ocmod.zip.
- Navigate to Modifications page (Extensions -> Modifications) and click on the light blue 'Refresh' button at the top of the screen to rebuild the modifications.
- From the admin menu navigate to the list of installed modules (Extensions -> Extensions -> Modules) and click on the red 'Uninstall' button for ADV Extended Customer Information.
- Navigate to Modifications page (Extensions -> Modifications) and tick the checkbox for ADV Extended Customer Information and click on the red 'Delete' button at the top of the screen. After this click on the light blue 'Refresh' button at the top of the screen to rebuild the modifications.
- From the admin menu navigate to the list of installed modules (Extensions -> Extensions -> Modules) and click on the red 'Uninstall' button for ADV Extended Customer Information.
- Remove the adv_extended_cust_info_OCv?.xml file from your vqmod/xml directory or just rename the .xml part to .xml_ so that vqmod does not read this file.
- Delete all files in vqmod/vqcache folder with file names like vq2-file_name.php and the mods.cache file from main vqmod folder.
- Navigate to Modifications page (Extensions -> Modifications) and click on the light blue 'Refresh' button at the top of the screen to rebuild the modifications (for OpenCart v2.x).
- Please make sure that the version of the extension is compatible with your OpenCart version.
- Please check the extension settings page for any error messages and try to fix them if they exist.
- If you are using a vQmod version of the extension, please check vqmod/logs folder for a "xxx.log" file. If the log file exists try to address the errors that are reported in it.
- OpenCart version you are using.
- Domain name on which the extension is installed.
- Extension name and version and type (vQmod or OCMod) you are having trouble with.
- Order ID from the extension purchase, you can find it in your account in OpenCart extensions store.
- Please describe the installation process in a few details. Did you manually edit any files? If so, which ones and what were the changes.
- If you got any error messages, please include the error messages in the email.
- In case the error message is generated by a vQmod cached file, please also attach that file to the email.
- If you have other third party extensions / modules / themes installed, please list them all.
memory_limit- this setting affects the export functionality. You should increase it in case you receive error like Fatal error: Allowed memory size of XX bytes exhausted...max_execution_time- it is recommended to use a higher value in case your database has lots of entries. It is estimated that database with thousands of orders takes several minutes to get exported. You should be fine if you set this setting at 600 seconds. This value should be increased in case you receive error like Fatal error: Maximum execution time of XX seconds exceeded...upload_max_filesize- this setting affects the import functionality and sets the maximum file size your server can accept. Set it accordingly to the file you need to uploadpost_max_size- usually a bit higher thanupload_max_filesize- Licensee can use this Product for one website ONLY (sub-domains are included), unless stated otherwise by Developer or unless Licensee have purchased a Unlimited License from Developer.
- Reselling the Product is NOT ALLOWED, unless License have written approval (or attached terms of use) obtained from Developer prior to the reselling.
- Copyrights removal is NOT ALLOWED, unless Licensee have written approval (or attached terms of use) obtained from Developer prior to the removal.
- Licensee cannot claim the Product as his, will respect the effort and time spent to accomplish this work.
- PHP 8.2+ compatibility
- improvements and bug fixes
- OpenCart 3.0 support
- small fixes and enhancements
- PHP7+ compatibility
- small fixes and enhancements
- added "Purchased Items" section in store front end listed on customer account page (My Account -> My Orders section)
- on ADV Extended Customer Information settings page (Extensions -> Extensions -> Modules -> ADV Extended Customer Information) added option to show/hide columns for Orders and Total Value on the customer list page (Customers -> Customers) and option to show/hide Purchased Items section in store front end listed on customer account page (My Account -> My Orders section)
- changed "Order Status for Total Value" select box on ADV Extended Customer Information settings page (Extensions -> Extensions -> Modules -> ADV Extended Customer Information) to multiselect type, now it is possible to set more then one order status used to calculate total value of orders shown on customer list page (Customers -> Customers)
- added "Note" field on the customer page (Customers -> Customers -> Edit) for writing internal notes to each customer
- other small fixes and enhancements
- new clean and fully responsive design (OC v2.x)
- added option to filter data in Order History tab by Date or Statistical Range and by Order Status
- added option to filter data in Purchased Products tab by Date or Statistical Range and by Order Status
- added option to select order status of received orders used to calculate Total Value on customer list page (Customers > Customers)
- added option to enable or disable collect data for Customer Track
- added option to set date format DD.MM.YYYY or MM.DD.YYYY
- added clickable link for Customer Name to directly open up the customer's details on Dashboard's Latest Orders table and on Order List page (Sales > Orders)
- better performance and less memory requirements
- fixed bug in currency conversion
- other enhancements in code and design changes
- fully compatible with MijoShop 3
- installation of extension is now via page of modules (Extensions -> Modules -> ADV Extended Customer Information)
- in Order History Tab was added columns for Shipping Method, Payment Method, Currency, Sub-Total, Shipping and Taxes
- in Purchased Products Tab was added columns for Total excl. Tax, Tax and Total incl. Tax
- in Shopping Cart Tab was added columns for Unit Price and Total
- in Wishlist Tab was added columns for Unit Price
- in Customer Track Tab was added option filter by Statistical Range, pagination of results was added
- minor design changes
- initial release
for OpenCart v1.5.x, v2.x, v3.x
Thank you for purchasing ADV Extended Customer Information for OpenCart. If you have any questions that are beyond the scope of this documentation, you've found a bug or need new feature, please use our support email: opencart.reports@gmail.com.
ADV Extended Customer Information is great extension if you want extended information about particular customer on one place. You can view order history and history of purchased products, further you can view and delete content of shopping cart and content of wishlist and you can track customer behavior and activity with possibility filtering by statistical range or date range and with option to delete tracking log.
What's included in ADV Extended Customer Information?
Now we will try to describe in details every part of ADV Extended Customer Information.
If you are using OpenCart v1.5.x this module will not work without installed vQmod. You must download and install vQmod before you install this extension. Make sure you select the vqmod-2.x.x-opencart.zip file.
Further information can be found:
Also not required for this module but it is recommended also installing a FREE module: VQMod Manager & Editor. This allows you to easily view vqmod errors and much more in the admin area without login via FTP.
Note: if you have changed the directory of the admin folder, when installed vQmod you will need to open: vqmod/install/index.php and edit:
$u->addFile('admin/index.php');If you are using OpenCart v2.x and v3.x you don't need to have vQmod installed. You can install extension via OCMod Extension Installer.
Installing ADV Extended Customer Information requires some knowledge of uploading files through FTP. If you would prefer us to install the module, we offer an install service for fee $15.
Please follow installation steps in exact order and don't use both OCMod and vQmod installation steps together, otherwise extension will not work a you will get errors!
Installation steps for OpenCart v3.x:
Note: When you install this module some required tables will be automatically added into your database and indexes for better performance of database queries.
Don't install OCMod and vQmod together, choose one installation type!
Installation steps with OCMod for OpenCart v2.x:
Installation steps with vQmod for OpenCart v2.x:
Note: When you install this module some required tables will be automatically added into your database, some columns into existing tables and indexes for better performance of database queries.
Installation steps with vQmod for OpenCart v1.5.x:
Note: When you install this module some required tables will be automatically added into your database, some columns into existing tables and indexes for better performance of database queries.
Please follow upgrade steps in exact order, otherwise extension will not work a you will get errors!
Upgrade with OCMod for OpenCart v2.x:
Upgrade with vQmod for OpenCart v2.x:
Upgrade with vQmod for OpenCart v1.5.x:
WARNING: Always back up your website files and database before applying updates to modules.
Upgrade with vQmod for OpenCart v1.5.x:
WARNING: Always back up your website files and database before applying updates to modules.
Uninstall extension on OpenCart v3.x:
Uninstall extension with OCMod on OpenCart v2.x:
Uninstall extension with vQmod on OpenCart v2.x or v1.5.x:
PLEASE DO NOT POST ANY CODE RELATED TO THE EXTENSION IN THE COMMENTS AREA OR FORUM.
Please use our support email opencart.reports@gmail.com for direct help..
Things to note when asking for help.
Free support service is provided for unchanged OpenCart installations with the default theme. Resolving conflicts with other third party extensions/modules or any customization to the extension is a paid service with negotiable price.
Before requesting help
Requesting help
Please describe your problem in as much detail as possible. This will make problem solving much faster.
As a bare minimum please state the following information when contacting:
Any additional information that you can give about the problem is greatly appreciated and will speed up the solving of the issue.
Below is a list of Joomla modules we have already tested and work with ADV Extended Customer Information. If you are using Joomla module not listed here, please send us request for modification.
Many 3rd party extensions work with ADV Extended Customer Information after additional modification. It is paid service, please send us request for this kind of modification.
Memory requirements and execution time requirements to export (especially PDF) can be quite high. If you see error message in export process, it means your web host does set too low values for memory access and time limits to execution of scripts and this values should be increased. If here described methods to increase this values don't help, it is recommend set narrower date range for export.
How to increase the memory limit and maximum execution time for scripts?
The server settings that should be modified are:
Method 1: Check your hosting Control Panel to modify this values.
Method 2: Modify your php.ini file with the following entries:
memory_limit = 256M
max_execution_time = 600
upload_max_filesize = 200M
post_max_size = 201M
Note: It is possible that modification of php.ini will not change your memory limit because your host does not allow it. Create a file in your root called phpinfo.php and copy this code in there:
<?php
// Show all information, defaults to INFO_ALL
phpinfo();
?>
Method 3: In your /admin/ folder of OpenCart, create a .htaccess file with the following entries:
php_value memory_limit 256M
php_value max_execution_time 600
php_value upload_max_filesize 200M
php_value post_max_size 201M
Method 4: Contact your web-host for assistance.
Method 5: If you really need PDF export, you can export to HTML and print to PDF file on your local computer.
PDF Printer must be installed on your computer: https://www.google.com/search?q=print+to+pdf
You can find additional information in php.net
You should carefully read the following Terms and Conditions. Your purchase or use of this extension implies that you have read and accepted these Terms and Conditions.
ADV Reports & Statistics, personally Mario Blazo (the "Developer") grant you (the "Licensee") a revocable, non-transferable, non-exclusive license, without right to sub-license, to use this extension (the "Product") in accordance with these Terms and Conditions.
In consideration of the mutual promises set forth herein, Developer and Licensee agree as follows:
1. License
Developer hereby grants to Licensee a revocable, non-transferable, non-exclusive license, without right to sub-license, to use the Product as set forth in this Terms and Conditions. Developer reserve ownership of all intellectual property rights inherent in or relating to the Product and hereby represents and warrants to Licensee that Developer is the owner of the Product or otherwise has the right to grant to Licensee the rights set forth in this Terms and Conditions.
2. Restrictions
3. Payment
In consideration for the grant of the license and the use of the Product, Licensee agrees to pay Developer the sum of the license fee. Payment of the license fee shall be made before delivery of the Software.
4. Warranty
Developer do not warrant nor guarantee that the Product will meet Licensee requirements or operate error free. Developer cannot guarantee that the Product will function with 3rd party products. The Product is provided "as is" without warranty of any kind, either expressed or implied. In no event shall Developer be liable for any damages including, but not limited to, direct, indirect, special, incidental or consequential damages or other losses arising out of the use of or inability to use the Product.
5. Software Maintenance and Updates
Developer shall provide to Licensee any new, corrected or enhanced version of the Software as created by Developer during time of subscription. Such enhancement shall include all modifications to the Software which increase the speed, efficiency or ease of use of the Software, or add additional capabilities or functionality to the Software, but shall not include any substantially new or rewritten version of the Software.
6. Refund Policy
Since Developer offer non-tangible irrevocable digital goods, Developer do not issue refunds after the purchase, which Licensee is responsible for understanding before buying the Product.
7. Final Agreement
Developer reserve the right to change or modify these Terms and Conditions at any time with no prior notice. Therefore, Developer encourage Licensee to review the Terms and Conditions every time Licensee install or update the Product.